Simple Environment Mapping
There is a classic technique in real-time computer graphics for making objects appear shiny or reflective. It’s called environment mapping or sometimes reflection mapping or, in this case, sphere mapping.
Environment mapping is not ray tracing. But it’s a cheesy way to get a similar effect. The idea for both of them is that, mathematically, it’s easy to calculate the direction from which a ray of light must have been coming before it bounced off a particular point of a shiny object and entered your eye. If the renderer were using ray tracing, it would follow this ray, for each point on your shiny object, backwards from your eye, and determine what object in the environment the ray came from; and that’s what you’d see in the reflection.
Ray tracing is still too computation-intensive to be done in real time. But a reflection vector is easy to calculate per-vertex, and if we could turn a reflection vector into a (u, v) texture coordinate pair, the graphics hardware is particularly good at looking up the color in a texture image that corresponds to that (u, v) pair. So all we need is an image that shows the objects in our environment.
In sphere mapping, the 3-D reflection vector is turned into a 2-D texture coordinate pair by mathematically applying a spherical distortion. This means the environment map should be a view of the world as seen through a 360-degree fisheye lens, or as reflected in a shiny ball like a holiday ornament. You can see why it is called sphere mapping.
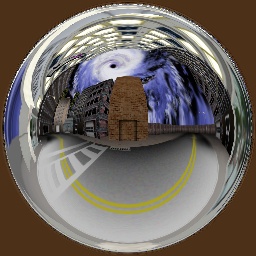
Panda3D can generate sphere maps for you. The above sphere map was generated with the following code:
scene = loader.loadModel('bvw-f2004--streetscene/street-scene.egg')
scene.reparentTo(render)
scene.setZ(-2)
base.saveSphereMap('streetscene_env.jpg', size = 256)
The idea is simply to put the camera in the middle of your environment,
approximately where your shiny object would be. Then just call
base.saveSphereMap(),
and a suitable sphere map image will be generated and written to disk for you.
Now you can apply the environment map to just about any object you like. For instance, the teapot:
tex = loader.loadTexture('streetscene_env.jpg')
teapot.setTexGen(TextureStage.getDefault(), TexGenAttrib.MEyeSphereMap)
teapot.setTexture(tex)
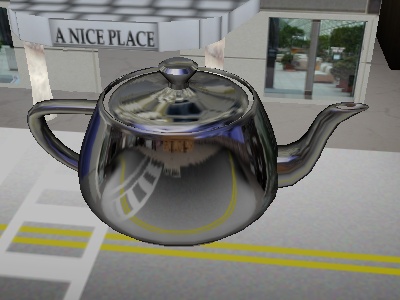
In this example, you can see that the key to sphere mapping in Panda is to set the TexGen mode to MEyeSphereMap. This mode computes a spherical (u, v) texture coordinate pair based on the reflection vector for each vertex of the teapot. In order for this to work, your model must have normals defined for all its vertices (the teapot has good normals).
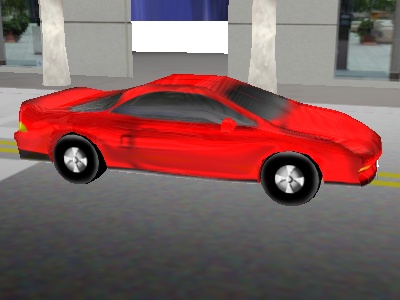
Shiny teapots are one thing, but it would be nice to make something like, say, a car look shiny. We could just do exactly the same thing as above, but our car has a texture map already. If we just replace the texture map with the environment map we’ll end up with a chrome car:
car = loader.loadModel('bvw-f2004--carnsx/carnsx.egg')
tex = loader.loadTexture('streetscene_env.jpg')
car.setTexGen(TextureStage.getDefault(), TexGenAttrib.MEyeSphereMap)
car.setTexture(tex, 1)

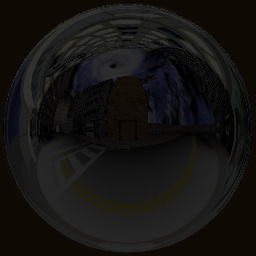
That looks pretty silly. So we’d really prefer to use multitexture to apply both the car’s regular texture, and layer a little bit of shine on top of that. We’ll use Add mode to add the environment map to the existing color, which is appropriate for a shiny highlight on an object.
In order to use Add mode without oversaturating the colors, we need to darken
the environment map substantially. We could use any image processing program to
do this; for this example, we’ll use Panda3D’s image-trans utility:
image-trans -cscale 0.2 -o streetscene_env_dark.jpg streetscene_env.jpg
So the new map looks like this:
While we’re fixing things up, let’s move the wheels to a different node, so we can assign the shine just to the metal and glass body of the car:
car = loader.loadModel('bvw-f2004--carnsx/carnsx.egg')
body = car.find('**/body')
body.findAllMatches('**/FL_wheel*').reparentTo(car)
And now the shine is applied like this:
tex = loader.loadTexture('streetscene_env_dark.jpg')
ts = TextureStage('env')
ts.setMode(TextureStage.MAdd)
body.setTexGen(ts, TexGenAttrib.MEyeSphereMap)
body.setTexture(ts, tex)
Note that the shiny highlights are now quite subtle, but still compelling, especially when you see the car move.
The sphere map technique isn’t perfect. The biggest problem with it is that you have to prepare it ahead of time, which means you have to know exactly what will be reflected in your shiny objects–it’s impossible for an object to reflect a dynamic object (for instance, an adjacent car).
Another problem is that the point-of-view is baked into the sphere map, so that if the camera were to swing around to view the car from the other side, the things you could see in the reflection would still be the objects behind the camera on this side.
Both of these problems can be solved by cube mapping, which is a more advanced technique for, among other things, applying environment maps. However, cube maps aren’t always ideal; very often, the venerable sphere map really is the best choice.
It is rare that an application presents a closeup view of a smooth, round mirrored object in which you can see reflections clearly, like the teapot example above; usually, reflections are just a subtle glinting on the surface, like the car. In these cases the sphere map is ideal, since it is not so important exactly what the reflections are, but simply that there are reflections. And the sphere map is the easiest and fastest way to render reflections.