Lenses and Field of View
Every Camera has a Lens object that defines the properties of its view. For simple applications, you do not need to think about the lens; you will probably be happy with the default lens properties. However, you will occasionally want to adjust some properties of the lens, such as its field of view, and there are several interfaces to do this, depending on how you want to think about the lens.
When you start ShowBase, a default camera and lens are created for you
automatically. The default camera object is stored in
base.cam (although by
convention, if you want to move the default camera you should manipulate
base.camera instead),
and the default lens is
base.camLens.
This default lens will almost always be a perspective lens–that is, an
instance of the class PerspectiveLens–unless you have done
something to change it to another kind of lens. A perspective lens is by far
the most common kind of lens used, and it behaves the same way the physical
lens in a camera works, or for that matter the same way the lenses in our eyes
work:
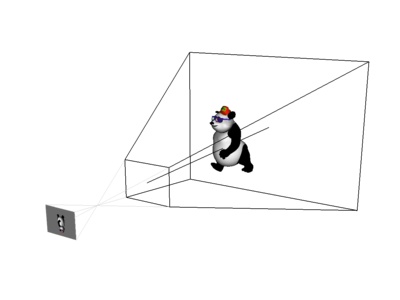
The illustration above shows a camera with an ordinary perspective lens observing a model in the world. The camera can only see the part of the world that falls within the black lines; this area is called the lens frustum.
In the picture, you can also see the image that the lens is capturing (and that image is shown upside-down, just as it would be in a real, physical camera). This image is just for the purposes of illustration; it isn’t really part of a Panda3D camera. It is included to help show the relationship between a Panda3D lens and a real, physical lens.
There are several different properties that can be set on a PerspectiveLens. Not all of them are independent; setting some properties will change the values of other properties. Here is an illustration:
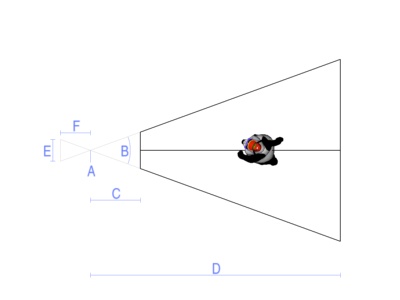
A. This point is the nodal point or eyepoint of the lens. It is also (usually) the origin, that is, the (0, 0, 0) point of the camera that holds the lens. Normally (in a default Z-up coordinate system), the lens will be looking down the +Y axis, so in the above illustration the +Y axis extends to the right from point A. The plane containing the nodal point, perpendicular the viewing direction (that is, the plane corresponding to the vertical line through point A), is called the camera plane.
Although it is possible to change the nodal point or view direction of a lens
to some point other than (0, 0, 0) or some direction other than down the +Y
axis, it is usually simplest and best just to move the entire camera using the
basic NodePath operations like setPos() and
setHpr().
B. This angle is the field of view, or fov, of the lens. You can easily change
this by setting a new value in degrees with
lens.setFov(angle). Making the field of
view smaller will bring things in closer, like a telephoto lens; it will also
diminish the visible effects of perspective. Making the field of view larger
will open up the view to more objects, like a wide-angle lens; it will also
increase the visible distortion of perspective. The field of view must be
greater than 0 degrees and less than 180, but values greater than 90 will seem
extremely distorted. (In the real world, perspective lenses rarely go wider
than 80 degrees, and that’s pretty wide.) The default field of view is 40
degrees, which is usually a pretty comfortable viewing angle.
There is actually a separate horizontal field of view and vertical field of
view, both of which may be independently controlled with the two-parameter form
of setFov(): lens.setFov(horizontalAngle, verticalAngle). Using the two-parameter form will change the aspect ratio of
the lens (see below). Normally, you would set the field of view using only the
one-parameter form, which sets the horizontal field of view directly, and
automatically recomputes the vertical field of view to preserve the same aspect
ratio.
C. This distance is called the near distance or near plane of the lens. Objects that are closer than this to the camera plane will not be rendered. You may set the near distance as small as you like, but it must be greater than 0; and the smaller you set it, the greater the likelihood that you will observe an artifact called Z-fighting, a shimmering of objects that are off in the distance. The default near distance is 1.0, which for many scenes is a reasonable compromise. Of course, the most appropriate value for your scene depends on the nature of the scene (as well as the measurement units in which your scene is modeled).
You may change the near distance at any time with the call
lens.setNear(distance).
D. This is the far distance or far plane of the lens. Similar to the near distance, objects that are farther than this from the camera plane will not be rendered. You may set this as large as you like, but like the near distance, setting it too large may result in Z-fighting. (However, the near distance value has a much greater impact on Z-fighting than the far distance value, because of the nature of the math involved.) The default far distance is 1000.0, which is appropriate for small scenes; you may need to set it larger if you have a large scene.
You may change the far distance with the call
lens.setFar(distance). Since the near
distance and far distance are often changed at the same time, there is a
convenience function to set then both:
lens.setNearFar(near_dist, far_dist)
E. This size is the film size of the lens. This is only an abstract concept in Panda3D; it is designed to simulate the actual film size of a physical lens. In a real, physical camera, the lens casts light onto a piece of film behind the lens, and the size of the film impacts the effective field of view of the lens via a mathematical formula that every photographer knows (and which I won’t repeat here). In Panda3D, you will probably ignore the film size, unless you are a photographer, or you want to set up a virtual lens that exactly matches the properties of some real, physical lens.
You can specify the film size with lens.setFilmSize(width) or lens.setFilmSize(width, height). Like field of view, the film size has two components, a
horizontal film size and a vertical film size. Also like field of view, if you
specify both components at once it will change the aspect ratio of the lens, but
if you set only the width, Panda will automatically compute the height to keep
the aspect ratio the same.
Setting the film size defines the units to be used for some of the other
advanced lens properties, such as the focal length (below) and the lens offset.
For instance, a 35mm camera exposes a rectangle on the film about 24mm x 36mm,
so if you wanted to simulate a 35mm camera, you would use
lens.setFilmSize(24, 36). This establishes that
your film units are in millimeters, so you could then specify a lens with a
focal length of 50mm using lens.setFocalLength(50). (Setting both the film size and the focal length like
this would automatically calculate the field of view; see below.)
F. This distance is the focal length of the lens. Like film size, this is only
an abstract concept in Panda3D, but it is a very important concept in a real,
physical camera. Technically, it is the distance between a lens’s nodal point
or camera plane and its focal plane or film plane, and it affects the field of
view of the lens. In real photography, lenses are typically described by their
focal length, rather than by their field of view. You can set the focal length
via lens.setFocalLength(distance).
G (not pictured). The final important property of a lens is its aspect ratio. This is the ratio of the width to the height of the image produced by the lens. It is almost, but not quite, the same as the ratio of the horizontal field of view to the vertical field of view. (It is not quite this, because a perspective lens is not linear in proportion to the angle.) Normally, you will want the aspect ratio of the lens to match the aspect ratio of your window; if it is something different, the image may seem stretched or squashed.
You can set the aspect ratio explicitly via lens.setAspectRatio(ratio). For instance, if you open a window that is 800 pixels
wide and 300 pixels tall, you might want to call
lens.setAspectRatio(800.0 / 300.0).
Interplay of lens properties
Note that, as mentioned above, several of these properties are interrelated. In particular, the field of view, focal length, and film size are closely tied together. Setting any two of these three properties will implicitly define the third one.
Panda will let you set all three of these properties as often as you like, but only the last two properties you set will be important. That is, if you set field of view and film size, Panda will calculate the focal length. If you set film size and focal length, Panda will calculate the field of view. If you set focal length and field of view, Panda will calculate the film size.
Also, the aspect ratio can be set either implicitly, by using the two-parameter
setFov() or setFilmSize() methods, or
explicitly, by directly specifying it with setAspectRatio().
If you set the aspect ratio explicitly, Panda will recompute your vertical field
of view and vertical film size to match.