Rendering Text
OnscreenText
OnscreenText is a convenience class
that is used a quick way to put text onscreen without having to go through
the trouble of creating a TextNode and setting properties on it. However, it
doesn’t have the full range of rendering options that you can get with
TextNode directly; and it doesn’t support the DirectGUI features of a
DirectLabel. Use an OnscreenText whenever you want a quick way to
display some ordinary text without a lot of fancy requirements.
from direct.gui.OnscreenText import OnscreenText
textObject = OnscreenText(text='my text string', pos=(-0.5, 0.02), scale=0.07)
The OnscreenText object inherits from NodePath, so all of the standard NodePath operations can be used on the text object. When you are ready to take the text away, use:
textObject.destroy()
A full list of arguments that can be passed to the constructor is available
on the OnscreenText page of the API
reference.
Text Nodes
The most fundamental way to render text in Panda3D is via the
TextNode interface. This may be a little more work than the
OnscreenText or DirectLabel objects, but it gives you a lot
more control over the appearance of the text.
To use a TextNode, simply create one and call setText() to
set the actual text to display, and then parent the TextNode wherever you like
(you can put it under aspect2d to make a 2-d onscreen text, or
you can put it in the 3-d world for in-the-world text). Note that if you parent
the text to render2d or aspect2d, you will probably need to give it a fairly
small scale, since the coordinate space of the whole screen in render2d is in
the range (-1, 1).
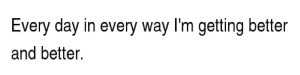
text = TextNode('node name')
text.setText("Every day in every way I'm getting better and better.")
textNodePath = aspect2d.attachNewNode(text)
textNodePath.setScale(0.07)

Note that the TextNode constructor takes a string name, which is not related to the text that is to be displayed. Also note that the default text color is white; we show it as black in these examples to make it easier to see on the white background.
There are a large number of properties that you can specify on the TextNode to control the appearance of your text.
Font
cmr12 = loader.loadFont('cmr12.egg')
text.setFont(cmr12)

You may use any font you like, including a TTF file; see Text Fonts.
Small Caps
text.setSmallCaps(True)
cmr12 = loader.loadFont('cmr12.egg')
text.setFont(cmr12)

setSmallCaps() accepts a boolean true or false value; set it true to enable
small caps mode. In this mode, instead of rendering lowercase letters, the
TextNode renders capital letters that are a bit smaller than the true capital
letters. This is an especially useful feature if your font of choice doesn’t
happen to include lowercase letters.
You can also specify the relative scale of the “lowercase” letters:
text.setSmallCapsScale(0.4)

Where 1.0 is exactly the same size as the capital letters, and 0.5 is half the size. The default is 0.8.
Slant
text.setSlant(0.3)

Slant can be used to give an effect similar to italicizing. The parameter value is 0.0 for no slant, or 1.0 for a 45-degree rightward slant. Usually values in the range 0.2 to 0.3 give a pleasing effect. You can also use a negative number to give a reverse slant.
text.setTextColor(1, 0.5, 0.5, 1)

The color is specified with its r, g, b, a components. Note that if a is not 1, the text will be slightly transparent.
Shadow
text.setShadow(0.05, 0.05)
text.setShadowColor(0, 0, 0, 1)

A shadow is another copy of the text, drawn behind the original text and offset slightly to the right and down. It can help make the text stand out from its background, especially when there is not a high contrast between the text color and the background color. (The text color in this example is exactly the same pink color used in the example above, but note how much clearer it is with the shadow.) The downside of a shadow is that it doubles the number of polygons required to render the text.
Setting a shadow requires two calls: setShadow() accepts a pair of numbers
indicating the distance to shift the shadow right and down, respectively, in
screen units; these are usually very small numbers like 0.05.
setShadowColor() accepts the r, g, b, a color of the shadow; the default is
black.
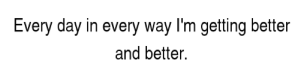
Wordwrap
By default, text will be formatted on one line, unless it includes newline characters. Enabling wordwrap will automatically break the text into multiple lines if it doesn’t fit within the specified width.
text.setWordwrap(15.0)
The parameter to setWordwrap() should be the maximum width of each line, in
screen units.
Alignment
Text is left-aligned by default; that is, it starts at the position you specify with textNodePath.setPos() and goes out to the right from there. If you have multiple lines of text, you may prefer to center the text or right-align it instead:
text.setAlign(TextNode.ACenter)
The parameter to setAlign() should be one of TextNode.ALeft,
TextNode.ACenter, or TextNode.ARight. Note that changing the alignment
of the text will shift its position relative to the starting point; that is, the
text is aligned relative to the starting point.
You can also set the alignment to one of TextNode.ABoxedLeft,
TextNode.ABoxedCenter, or TextNode.ABoxedRight. These are similar to the
above, but they do not shift the text’s position relative to the starting point;
the text is aligned within the specified margin, which extends for wordwrap
units to the right of the starting point.
Frame
You can specify that a thin frame should be drawn around the entire text rectangle:
text.setFrameColor(0, 0, 1, 1)
text.setFrameAsMargin(0.2, 0.2, 0.1, 0.1)
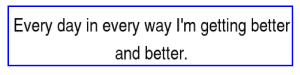
As with the shadow, specifying a frame requires two calls; one to specify the
color, and another to specify the dimensions of the frame. The call
setFrameAsMargin() specifies four parameters, which represent the amount of
space to insert between the edge of the text and the frame on the left, right,
bottom, and top edges, respectively. All four parameters can be 0.0 to tightly
enclose the text (although some fonts render a little bit outside their reported
boundaries).
Card
Finally, you can draw a solid card behind the text rectangle:
text.setCardColor(1, 1, 0.5, 1)
text.setCardAsMargin(0, 0, 0, 0)
text.setCardDecal(True)
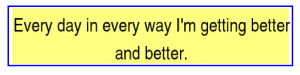
This can also help to make the text easier to read when it is against a similar-
colored background. Often, you will want the card to be semitransparent, which
you can achieve by specifying an alpha value of 0.2 or 0.3 to the
setCardColor() method.
The parameters to setCardAsMargin() are the same as those for
setFrameAsMargin(), above: the distance to extend the card beyond the left,
right, bottom, and top edges, respectively. (In this example, we have both the
card and the frame on at the same time, and you can see that the card exactly
fits the text, while the frame extends a little bit beyond–showing the effects
of the slightly different parameters passed to setFrameAsMargin() and
setCardAsMargin() in this example.)
If the text is to be visible in the 3-d world (that is, parented to render
instead of to render2d), then you may observe z-fighting, or flashing, between
the text and the card. To avoid this, call text.setCardDecal(True). This is
not necessary when the text will be parented under render2d or aspect2d, or when
you will be controlling the binning of the text explicitly.
Picking a Text Node
Strictly speaking, a TextNode has no geometry, so you can’t pick it.
There are two possible workarounds.
Create your own card to go behind the TextNode, using e.g. CardMaker. You should be able to say
cardMaker.setFrame(textNode.getFrameActual())to set the card to be the same dimensions as the text’s frame. Then you will need to either offset the text a few inches in front of the card to prevent Z-fighting, or explicitly decal the text onto the card, with something like this:card = NodePath(cardMaker.generate()) tnp = card.attachNewNode(textNode) card.setEffect(DecalEffect.make())
Instead of parenting the TextNode directly to the scene, parent the node returned by
textNode.generate()instead. This will be a static node that contains the polygons that render the text. If the text changes in the future, it won’t automatically update the geometry in this node; you will have to replace this node with the new result oftextNode.generate(). But this node will be 100% pickable. In particular, if you have specifiedtextNode.setCardDecal(True), then the first child of the node should be the card geometry.