Simple Texture Replacement
Although usually you will load and display models that are already textured, you can also apply or replace a texture image on a model at runtime. To do this, you must first get a handle to the texture, for instance by loading it directly:
#include "texturePool.h"

PT(Texture) tex;
tex = TexturePool::load_texture("myTexture.png");

NodePath smiley;
smiley = window->load_model(window->get_render(), "smiley.egg");
smiley.set_texture(tex, 1);
The above TexturePool::load_texture() call will search along the
current model-path for the named image file (in this example, a file named
“myTexture.png”). If the texture is not found or cannot be read for some
reason, None is returned.
Note that the Texture class is reference counted,
so it is necessary to use a smart PT(Texture) pointer to ensure that it
is not automatically deleted by the garbage collector.
Once you have a texture, you can apply it to a model with the
set_texture() call. For instance, suppose you used the
CardMaker class to generate a plain white card:
CardMaker cm("card");
NodePath card = render.attach_new_node(cm.generate());
Then you can load up a texture and apply it to the card like this:
PT(Texture) tex = TexturePool::load_texture("maps/noise.rgb");
card.set_texture(tex);
(Note that it is not necessary to use the override parameter to the
set_texture() call–that is, you do not need to do
card.set_texture(tex, 1)–because in this case, the card does not already
have any other texture applied to it, so your texture will be visible even
without the override.)
In order for this to work, the model you apply it to must already have texture coordinates defined (see Simple Texturing). As it happens, the CardMaker generates texture coordinates by default when it generates a card, so no problem there.
As a special shortcut, you can also directly load the texture as though it were a model, which will automatically create a card for it:
NodePath card;
card = window->load_model(window->get_render(), "maps/noise.rgb");
This short piece of code will result in a single polygon in the scene with
the noise texture applied to it. Of course, if you need it in the 2-D scene,
you should use get_aspect2d() or
get_render2d() instead of
get_render().
You can also use set_texture() to replace the texture on an
already-textured model. In this case, you must specify a second parameter to
setTexture, which is the same optional Panda override parameter you can specify
on any kind of Panda state change. Normally, you simply pass 1 as the second
parameter to set_texture(). Without this override, the
texture that is assigned directly at the Geom level will have precedence over
the state change you make at the model node, and the texture change won’t be
made.
For instance, to change the appearance of smiley:
NodePath smiley;
PT(Texture) tex;

smiley = window->load_model(window->get_render(), "smiley.egg");
tex = TexturePool::load_texture("maps/noise.rgb");
smiley.set_texture(tex, 1);
Often, you want to replace the texture on just one piece of a model, rather than
setting the texture on every element. To do this, you simply get a
NodePath handle to the piece or pieces of the model that you want to
change, as described in the section Manipulating a Piece of a Model, and
make the NodePath.set_texture() call on those NodePaths.
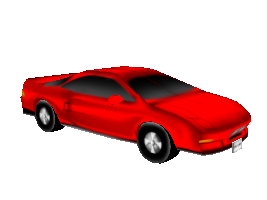
For instance, this car model has multiple textures available in different colors:
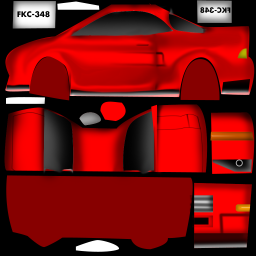
For the most part, this car was painted with one big texture image, which looks like this:
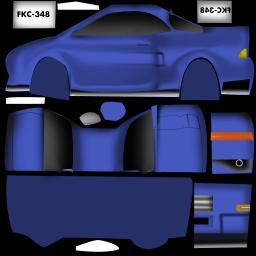
But we also have a blue version of the same texture image:
Although it is tempting to use NodePath.set_texture() to assign the
blue texture to the whole car, that would also assign the blue texture to the
car’s tires, which need to use a different texture map. So instead, we apply the
blue texture just to the pieces that we want to change:
NodePath car = window->load_model(window->get_render(), "bvw-f2004--carnsx/carnsx.egg");
PT(Texture) blue = TexturePool::load_texture("bvw-f2004--carnsx/carnsx-blue.png");
car.find('**/body/body').set_texture(blue, 1);
car.find('**/body/polySurface1').set_texture(blue, 1);
car.find('**/body/polySurface2').set_texture(blue, 1);
And the result is this:

As of Panda3D 1.10.4, there is an easier way to do this as well, by allowing you to tell Panda3D to replace the texture on all parts where a particular existing texture is applied:
NodePath car = window->load_model(window->get_render(), "bvw-f2004--carnsx/carnsx.egg");
PT(Texture) red = TexturePool::load_texture("bvw-f2004--carnsx/carnsx.png");
PT(Texture) blue = TexturePool::load_texture("bvw-f2004--carnsx/carnsx-blue.png");
car.replace_texture(red, blue);
If you are interested in changing the image of a texture during program execution, say to adjust some of its pixels, see Creating New Textures from Scratch.