Tinting and Recoloring
Color and the Model Loader
When you create a 3D model in Max, Maya, or the like, you can color the model right in the modeling program. I’m not talking about using a texture. I’m talking about just setting a single color to the model as a whole. This is called a “flat color”. These art programs also allow you to “paint vertex colors”: you can color each vertex of the model a different color. Of course, sometimes you do neither, in which case the model is just white.
Every model you load already has a color attribute. Color Attributes are usually not created by the programmer explicitly, they’re usually created by the model loader only. There are three possible color attributes created by the model loader:
Method |
Explanation |
|---|---|
Used by the model loader to indicate that the model has vertex colors stored in its vertex arrays. |
|
Used by the model loader to indicate that the model has a single flat color. |
|
Used by the model loader to indicate that no particular color was specified. Essentially the same as flat white, but possibly a little faster to render. |
Panda combines these color attributes with the textures. If you are accustomed to Photoshop, you should think of the model’s color as the bottom (background) layer, and the textures go above that. By default, each texture is modulated (multiplied) with the previous layer, but as in Photoshop, that can be changed.
Recoloring the Model
If you wish, you can manually override the color attribute which has been specified by the model loader.
nodePath.set_color(r, g, b, a);
Again, this is an override. If the model already had vertex colors, these will
disappear: the set_color() method is replacing those colors
with a new one. If the model already had a flat color, that will be replaced
with the new flat color.
It should be mentioned that the color attribute created by the model loader has
low priority. That means that even a default-priority
set_color() is enough to override it.
You can remove a previous set_color() using
clear_color().
Tinting the Model
Sometimes, you don’t want to replace the existing color; sometimes, you want to tint the existing colors. For this, you need setColorScale:
nodePath.set_color_scale(r, g, b, a);
This color will be modulated (multiplied) with the existing color.
You can remove a previous set_color_scale() using
clear_color_scale().
Demonstration
To see the difference between set_color() and
set_color_scale(), try the code sample below. You will need
the nik-dragon model from the Cartoon Shading sample program, which has vertex
colors and no texture:
import direct.directbase.DirectStart
from panda3d.core import ColorAttrib

# Load three copies of Nik's dragon, which has vertex colors.
model1 = loader.loadModel("nik-dragon")
model2 = loader.loadModel("nik-dragon")
model3 = loader.loadModel("nik-dragon")

# Put them in the scene.
model1.reparentTo(render)
model2.reparentTo(render)
model3.reparentTo(render)

# Arrange them left-to-right
model1.setPos(-10,50,0)
model2.setPos(  0,50,0)
model3.setPos( 10,50,0)

# Model 1 will be left alone, so you can see the original.
# Model 2 will be recolored light blue.
# Model 3 will be tinted light blue.
model2.setColor(0.6, 0.6, 1.0, 1.0)
model3.setColorScale(0.6, 0.6, 1.0, 1.0)

base.run()
This produces the following output:
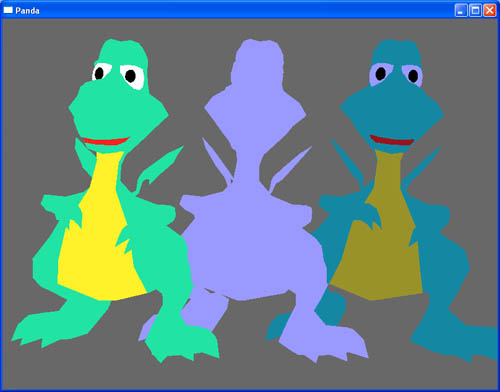
The model on the left is the original, unaltered model. Nik has used vertex
colors throughout. The yellow of the belly, the black eyes, the red mouth, these
are all vertex colors. The one in the middle has been setColor ed to a
medium-blue color. As you can see, the setColor completely replaces the
vertex colors. The one on the right bas been setColorScale ed to the same
medium-blue color, but this only tints the model.
A Note about Color Spaces
All colors that Panda3D expects are floating-point values between 0.0 and 1.0.
Panda3D performs no correction or color space conversion before writing them
into the framebuffer. This means that if you are using a linear workflow (ie.
you have set framebuffer-srgb in Config.prc or are using a
post-processing filter that converts the rendered image to sRGB), all colors
are specified in “linearized sRGB” instead of gamma-encoded sRGB. Applying a
color obtained from a color picker is no longer as simple as dividing by 255!
An easy way to correct existing colors when switching to a linear workflow is to apply a 2.2 gamma. This is a good approximation for the sRGB transform function:
model1.set_color(powf(0.6, 2.2), powf(0.5, 2.2), powf(0.3, 2.2));
A better method is to use the sRGB conversion functions that Panda3D provides.
For example, to apply the #51C2C6 color, you can do as follows:
#include "convert_srgb.h"

model1.set_color(
   decode_sRGB_float(0x51),
   decode_sRGB_float(0xC2),
   decode_sRGB_float(0xC6),
);
If you are not using a linear workflow, or don’t know what that is, you don’t need to worry about this for now.