Running your Program
This section will explain how to compile a C++ program that uses the Panda3D libraries. On Windows, this is done using the Microsoft Visual C++ compiler; on all other systems, this can be done with either the Clang or the GCC compiler. Choose the section that is appropriate for your operating system.
Compiling your Program with Visual Studio
The descriptions below assume Microsoft Visual Studio 2015, but they should also work for 2017.
The Panda3D 1.9 SDK is compiled with the Visual C++ 2010 compiler. This means that if you use Panda3D 1.9, your project needs to be compiled with the Visual C++ 2010 compilers as well, or it will crash in mysterious ways, so we highly recommend upgrading to 1.10. However, if you prefer to use Panda3D 1.9, not all is lost—the necessary compilers are part of the Windows 7.1 SDK, which is also accessible from Visual Studio 2015.
You can download and install the Windows 7 SDK from here: https://www.microsoft.com/en-us/download/details.aspx?id=8279 Due to a bug in the installer, you may have to first uninstall any instance of the “Visual C++ 2010 Redistributable” in your Control Panel.
Setting up the project
When creating a new project in Visual Studio, be sure to select the template for a “Win32 Console application” under the Visual C++ templates category. We recommend disabling “Precompiled headers” for now. (Don’t worry, you can still change these things later.)
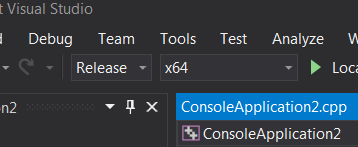
When you created your project, the first thing you’ll need to do is change “Debug” to “Release” below the menu bar, as shown in the image below. This is because the SDK builds of Panda3D are compiled in Release mode as well. The program will crash mysteriously if the setting doesn’t match up with the setting that was used to compile Panda3D. This goes for the adjacent platform selector as well; select “x64” if you use the 64-bit Panda3D SDK, and “x86” if you use the 32-bit version.
Now, open up the project configuration pages. You will have to change the “Platform Toolset” in the “General” tab to “Windows7.1SDK”, since that is the toolset that the 1.9 SDK was compiled with.
Furthermore, we need to go to C/C++ -> “Preprocessor Definitions” and remove
the NDEBUG symbol from the preprocessor definitions. This was
automatically added when we switched to “Release” mode, but having this
setting checked removes important debugging checks that we still want to keep
until we are ready to publish the application.
Now we are ready to add the paths to the Panda3D directories. Add the following paths to the appropriate locations (replace the path to Panda3D with the directory you installed Panda3D into, of course):
Include Directories
C:\Panda3D-1.9.4\include;C:\Panda3D-1.9.4\python\include
Library Directories
C:\Panda3D-1.9.4\lib;C:\Panda3D-1.9.4\python\libs
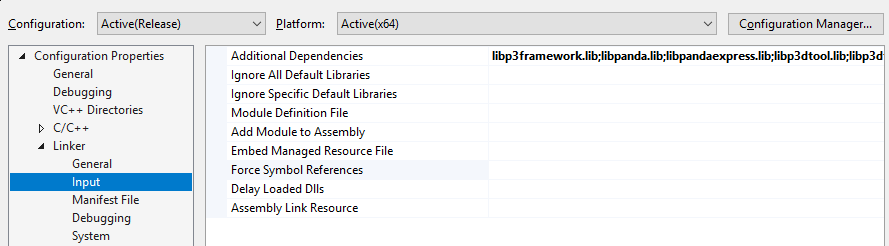
Then, you need to add the appropriate Panda3D libraries to the list of “Additional Dependencies” your project should be linked with. The exact set to use varies again depending on which features of Panda3D are used. This list is a reasonable default set:
libp3framework.lib
libpanda.lib
libpandaexpress.lib
libp3dtool.lib
libp3dtoolconfig.lib
libp3pystub.lib
libp3direct.lib
This should be enough to at least build the project. Press F7 to build your project and start the compilation process. You may see several C4267 warnings; these are harmless, and you can may suppress them in your project settings.
There is one more step that needs to be done in order to run the project, though. We need to tell Windows where to find the Panda3D DLLs when we run the project from Visual Studio. Go back to the project configuration, and under “Debugging”, open the “Environment” option. Add the following setting, once again adjusting for your specific Panda3D installation directory:
PATH=C:\Panda3D-1.9.4\bin;%PATH%
Now, assuming that the project built successfully, you can press F5 to run the program. Of course, not much will happen yet, because we don’t have any particularly interesting code added. The following tutorial will describe the code that should be added to open a Panda3D window and start rendering objects.
Compiling your Program with GCC or Clang
On platforms other than Windows, we use the GNU compiler or a compatible
alternative like Clang. Most Linux distributions ship with GCC out of the
box; some provide an easily installable package such as build-essential
on Ubuntu or the XCode Command-Line Tools on Mac OS X.
The following pages describe how this is accomplished: